There are a few underutilized sides of SQL Server, especially when it comes to monitoring…
Imagine you get a task one day to set the entire world’s SQL Server instances in order. You have no idea how many, where, and what versions. You just have to sort them out. What do you do?
Here is where you can start:
1. Ask the IT department to give you unlimited user rights to the network. (Good luck with that, right? 🙂 ) Yes, you do need some admin access to resources.
2. Ask the company you work for to designate one Server for your needs. It does not have to be very powerful, in some cases even a laptop will do. Well, with a laptop you would wait a bit longer, but if you had unlimited access to coffee… it would not be a problem. 🙂
3. Ask the IT department to install Windows 2008 and SQL 2008 on your designated server.
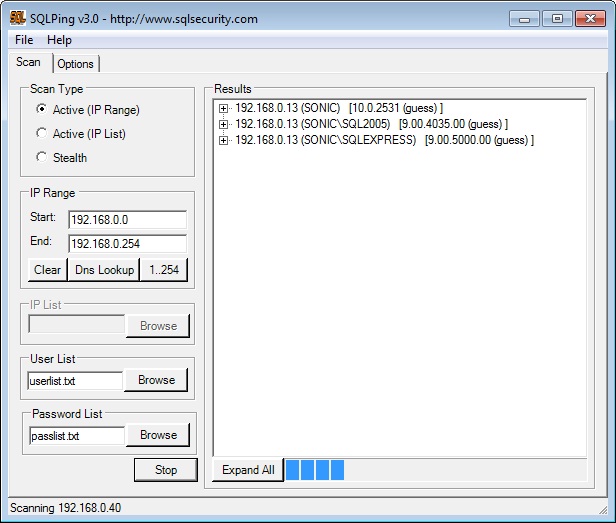
4. Download the free SQLPing tool from the internet. Here is how the SQLPing looks like when it’s in action:
5. Create a database on your designated server and then create the following table in it:
CREATE TABLE [dbo].[SQLServer_Scan] ( [ServerIP] [nvarchar](255) NULL , [TCPPort] [float] NULL , [ServerName] [nvarchar](255) NULL , [InstanceName] [nvarchar](255) NULL , [BaseVersion] [nvarchar](255) NULL , [SSNetlibVersion] [nvarchar](255) NULL , [TrueVersion] [nvarchar](255) NULL , [ServiceAccount] [nvarchar](255) NULL , [IsClustered] [nvarchar](255) NULL , [Details] [nvarchar](MAX) NULL , [DetectionMethod] [nvarchar](255) NULL ) ON [PRIMARY]
6. Import the CSV file into the table you just created. You can use the Import-Export wizard.
7. Use the following T-SQL to create your server group in the CMS (Central Management Server)
DECLARE @server_group_id INT EXEC msdb.dbo.sp_sysmanagement_add_shared_server_group @parent_id = 1, @name = N’Test1′, @description = N”, @server_type = 0, @server_group_id = @server_group_id OUTPUT SELECT @server_group_id
8. Note the ID of the group you just created (the ID is returned by the query when you created the group)
9. Use the following query to generate the script which will get all SQL Server instances from your SQL Server table you created in point 5 and import them as Registered instances in the CMS group you created in point 7.
SET nocount ON ; WITH cte AS ( SELECT DISTINCT CASE CONVERT(INT, ( CHARINDEX(‘.’, [ServerName]) )) WHEN 0 THEN RTRIM(LTRIM([ServerName])) ELSE ISNULL(SUBSTRING([ServerName], 0, CHARINDEX(‘.’, [ServerName])), ‘a’) END AS ServerName , CASE [InstanceName] WHEN ‘MSSQLSERVER’ THEN ” ELSE ” + [InstanceName] END AS [InstanceName] FROM [dbo].[SQLServer_Scan] WHERE instanceName NOT LIKE ‘SQL SERVER (MSSQLSERVER)’ AND instancename NOT LIKE ‘MSSQLSERVERADHELPER100’ AND instancename NOT LIKE ‘MSSQLSERVEROLAPSERVICE’ ) SELECT ‘Declare @server_id int EXEC msdb.dbo.sp_sysmanagement_add_shared_registered_server @server_group_id=39, @name=N”’ + LTRIM(RTRIM(ServerName)) + LTRIM(RTRIM(instancename)) + ”’, @server_name=N”’ + LTRIM(RTRIM(ServerName)) + LTRIM(RTRIM(instancename)) + ”’, @description=N””, @server_type=0, @server_id=@server_id OUTPUT Select @server_id go’ FROM cte
Make sure to replace the server group id with the corresponding ID of the group you created in point 9. I have highlighted the id above in red, and the value for me is 39, but for you might be something different. Also make sure to extend the maximum number of characters in each column in the SSMS options – by default they are 256, but in this case you can make them 2560 (Tolls -> Options ->Query Results -> SQL Server -> Results to Text)
10. Copy the result from the query in point 9 and execute it.
11. Refresh the CMS view and enjoy. Now you have a bulk handle to all SQL Server instances on your network, you can easily create new groups in the CMS and move the SQL Server instances you have explored to the new groups and so on.
/ Feodor Georgiev

