Ett tips inför nästa veckas "TechX Azure" är att ladda ned boken "SQL on Azure"…
On every virtual machine (VM) that is created in Azure, you are provided with a temporary storage automatically. This temporary storage is “D:” on a Windows VM by default. A temporary storage in Azure VM is an SSD but not a spinning disk. As you all know, SSDs don’t have any moving parts so when a read or write occurs, there’s almost no I/O latency, which equates into a better performance of TempDB when configured on this drive.
This temporary storage drive is present on the physical machine which is hosting your VM and hence can have higher IOPS and lower latency when compared to the persistent storage like data disk. The temporary storage provided with each VM has no extra cost associated with it for storage space as well as for transactions.
As the name itself suggests, this is purely a ‘TEMPORARY’ drive. The temporary storage gets recreated every time when:
-You resize the VM
-You shutdown or restart your VM
-Your VM is moved to a different host server (due to service healing, shutdown and restart)
-The host is updated
-The host experiences a hardware failure etc.,
In short, the SSD drive (D:\) is not persistent, so its contents and permissions will be lost if the VM moves to a different host. So….
- Do not store your data or log files there. Use (persistent) drives from Azure Storage.
- If using TempDB, SQL Server requires accessing the directory specified to store them. The following sections describe how to store SQL Server TempDB on the SSD drive and automatically recreate directory if the VM moves to a different host.
Configure SQL Server to Use Temporary Storage
- Connect to your VM in Azure
- Create a new directory in the root of the D:\ drive called SQLTEMP (You must create a folder as you will not have permissions to write directly to the root of D:\)
- Launch a new query window in the SQL Server instance and Configure the TempDB system database to store data and log files on the D:\ drive. The following code can do the things for you
USE MASTER

GO

ALTER DATABASE tempdb MODIFY FILE (NAME= tempdev, FILENAME= ‘D:\SQLTEMP\tempdb.mdf’)

GO

ALTER DATABASE tempdb MODIFY FILE (name = templog, filename = ‘D:\SQLTEMP\templog.ldf’)

GO
- Restart the SQL Server services
- In File Explorer, navigate to the D:\SQLTEMP directory you created earlier. You should now see two files for TempDB in the folder
Configure Windows Server Startup to Prepare the SSD
- In File Explorer, create a new folder here: C:\SQLServerFiles\TEMPDBSetup
- Copy and paste the following code into a new file and save the file to C:\SQLServerFiles\TEMPDBSetup\SQLTEMPDBInit.ps1
$SQLService="SQL Server (MSSQLSERVER)"


$SQLAgentService="SQL Server Agent (MSSQLSERVER)"


$tempfolder="D:\SQLTEMP"


if (!(test-path -path $tempfolder)) { `


New-Item -ItemType directory -Path $tempfolder `


}

Start-Service $SQLService

Start-Service $SQLAgentService
- Launch PowerShell as Administrator. Run the following code to change the execution policy to RemoteSigned and type Y to confirm
Set-ExecutionPolicy RemoteSigned
- Launch the Windows Task Scheduler by navigating to the Start screen, click Administrative Tools, then double-click Task Scheduler
- Using Task Scheduler create a Basic Task that executes when the computer starts and executes the script in the Powershell file. For this, specify:
Program/script: powershell
Arguments: –file ‘C:\SQLServerFiles\TEMPDBSetup\SQLTEMPDBInit.ps1’
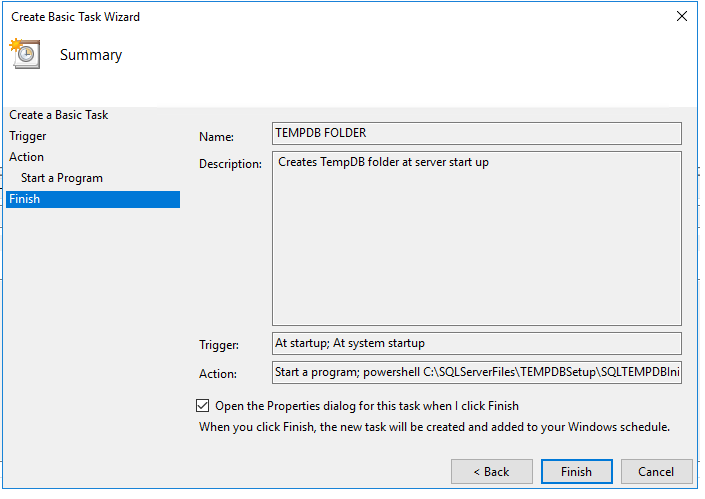
- On the summary page, check the box next to Open the Properties dialog for this task when I click Finish and click Finish
- On the Properties screen, click the Change User or Group button and type SYSTEM for the name and click OK to save the changes
Give yourself a pat on the back !!! Your TempDB will be proud of your actions 🙂